11

Have a look at these two pictures:

mine

desirable exemplar

The first is mine, but is so...flat. (You can find the original here.) I took my photo with a Canon EOS 100D, while the second was taken with a Nikon. I cannot believe that Nikon is so much better than Canon in the dynamic range handling, so I guess the second has been retouched.

How should I retouch the first one? Is there software to improve the sky?

Warren Young
  • 5,224
  • 1
  • 25
  • 35
Revious
  • 341
  • 3
  • 11
  • 3
    For reference, this seems to be the original cat image. In the comments the author reveals a bit of how he did it. He claimed to not have used hdr, but only adjustments in lightroom. – PlasmaHH May 22 '14 at 15:43
  • I guess its a matter of the scene itself. The sky in your photo have no contrast at all, yet the Nikon one the sun is blocked/spreaded by the clouds. Kind of a perfect moment issue. – midnite May 22 '14 at 19:04
  • I guess while shooting you may lower the EV a bit, to let the clouds not to be white-out to retain the contrasts. – midnite May 22 '14 at 19:06
  • It may technically not be HDR in the sense of working from multiple exposures, but starting from raw you can push the dynamic range quite a bit. I assume this is easy in lightroom, though in the gimp it requires a plugin design for HDR. (edit: Warren Young's answer below for details) – Chris H May 23 '14 at 11:00
  • @Jakub: look at the link I provided for the original source and comments by the author. – PlasmaHH May 26 '14 at 13:06
  • 1
    @Jakub: Are you saying the author lied when he said that all he did was lighting adjustments in lightroom? – PlasmaHH May 26 '14 at 14:23
  • 1
    You are really comparing apples to oranges. One photo is backlit where the other is front lit. One photo is taken during the golden hour, the other looks like it's taken several hours past the golden hour judging by the shadows. Light light light. There's no substitute for it in photography – Rado Jun 06 '14 at 02:34
  • @Rado: when are the golden hours? What is front lit? Thanks a lot! – Revious Jun 06 '14 at 12:08
  • @Revious back light is exemplified by the cat shot. The light illuminates the back of your subject. Front light is the opposite where the light source (sun in this case) illuminates the front of the subject as in your picture. Now, back lit scenes are much more difficult to photograph, but they would usually produce a greater dynamic range when done right as in the cat shot. The light in your shot is much more even so the dynamic range will be naturally less. Also, with backlit clouds, they normally pop as the light goes through and around them. This is how you get those nice peaking rays – Rado Jun 06 '14 at 13:25
  • 1
    @Revious ... Cont. ... With front lit scenes, you will not get as much pop in the clouds without the aid of a circular polarizer. About golden hour, it is the time of day with best light for photographs. Normally within an hour past sunrise and the again before sunset. Thats when the sun is really low and creates nice soft golden light (look at the rays on the cat). Your shot is done with a harsher light when the sun is higher up. – Rado Jun 06 '14 at 13:32

7 Answers7

15

There are a number of things you can do in post processing, including using HDR or using blended exposures. I think it's likely that something like that has been done in the example you give, because there's going to be a lot of natural dynamic range in a scene which includes both the sun in the frame and the shaded side of a building with no apparent light source.

Most of these post-processing techniques work best if you have the image in RAW, and best of all if you actually have a bracketed series. If you just have a JPEG, it you have less flexibility to work.

But the easiest trick for dramatic skies is to use a polarizing filter. These allow only light of a certain orientation through. They're made so they rotate in place, so turn until it's aligned with the sun — you'll see the dramatic effect in the viewfinder.

Take a look at this series of questions about polarizing filters for more:

and also What is the difference between a linear and a circular polarizer? on the issue of circular vs. linear (which, although the name may seem otherwise, has nothing to do with with whether the filter rotates or not).

You also have to watch the light, an done position of the sun. The low angle of the sunset is naturally impressive, while mid-day light is harsh and hard to work with. I think you might also find Why do breathtaking views turn into "boring" photos, and how can I do better? and the excellent answers there helpful.

In general, I see that you know that the secret to good photos isn't the camera brand or model. But it's also not about after-the-fact software effects. From this and a few of your previous questions, it seems like you have a lot of interest improving your photography. We can answer a lot of questions here, but I also have a book recommendation. There are a lot of technical books on the knobs and dials of photography, but I don't think that's what you need. Instead, take a look at Capturing Light: The Heart of Photography by Michael Freeman, or The Photographer's Eye and others in that series by the same author. These books emphasize mental process for making photographs, and if you have that, you can figure out the technical.

mattdm
  • 143,140
  • 52
  • 417
  • 741
  • I've got a linear Polarizer only. Will it work good the same? – Revious May 22 '14 at 11:42
  • Linear polarizers will (can?) cause problems with PDAF; you may need to use CDAF or manual focusing. – Philip Kendall May 22 '14 at 12:08
  • 3
    +1, but a polarizer would have done nothing good for the cat picture. Polarizers have the strongest effect when the sun comes from 90˚ to the lens axis, and the least at 0˚ and 180˚. All a polarizer will do here is increase the risk of flare. (It would do good things to the mountain pic, though.) The cat image has clearly been manipulated out-of-camera. In addition to the oddly-lit space on the shady side of the far building, another telltale is the sky near the window edge above the cat. See the gradient? That's a darkening effect with too much feathering. – Warren Young May 22 '14 at 14:33
9

The single easiest, most effective thing you could do is shoot raw. (I assume you didn't because you describe the linked JPEG as "the original.") Raw gives you the dynamic range you need to bring the sky brightness down out of the white-clipping range.

Case in point:

Goblin Valley, original

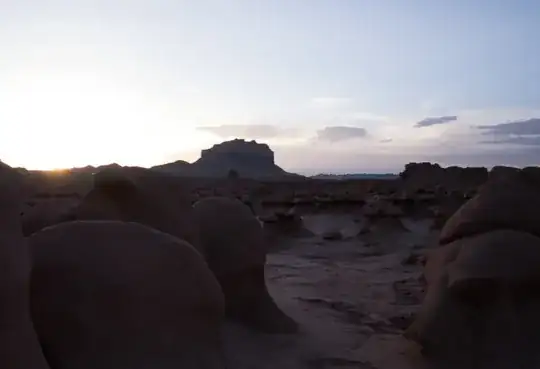
Like your cat picture example, this was shot straight into the sun with the sun low on the horizon. It was shot with a Panasonic DMC-GX1, which probably doesn't have as much inherent dynamic range as your Canon 100D. Yet, with a fair bit of exposure pushing and pulling in Lightroom, voilà:

Goblin Valley, final

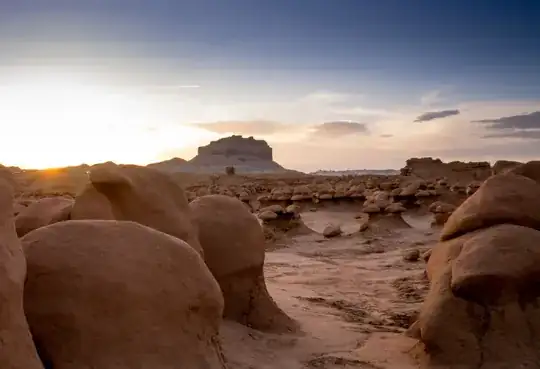
As you can see, I've still lost the sun's disc in the flare. To get the extreme effect as in the cat picture without any kind of exposure blending (manual or HDR), you need to start with either a lot more dynamic range in the exposure or an even more under-exposed shot.

Given the relative camera specs (Canon 100D vs Nikon D7000) I don't think the cat photographer was working with any more dynamic range than is available to you. You just have to tell the camera to save it all by shooting raw, then make use of it with a raw processor. Lightroom is just one of several suitable programs.

Exposure blending methods take a lot more work and are conditional besides. They don't work well when there is motion in the scene, they don't work well without a tripod when there are nearby items in the scene due to parallax, etc.

Your mountain pic is nowhere near as difficult a scene as either my Goblin Valley pic or the cat pic. It may well be that only a polarizer is required.

Here's what a polarizer can do:

Colorado farm

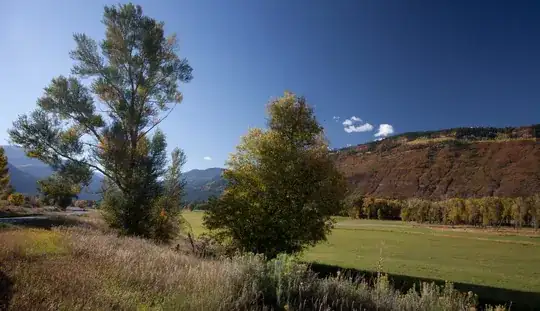
That picture was taken by a Canon camera, straight out of the camera with no exposure adjustment. You can tell it was taken with a polarizer by the sky gradient. That's a characteristic effect of a polarizer, especially with a wide-angle lens, since the effect varies with the angle between the sun and the lens axis. A polarizer's effect is strongest at 90˚ to the sun — straight left or straight right — decreasing to essentially zero when the sun is in front of the camera or behind it.

The horizontal angle of view on the lens used for this picture was about 80˚, which is why the effect varies so much from left to right. Since the effect is clearly strongest at the right edge of the frame, that means the sun must be no more than 10˚ out of the left edge of the frame.

I always shoot raw. You never know when you'll need the extra dynamic range to play with.

I also always carry a polarizer, even in my daily-carry bag which holds only 10 lbs of stuff including a tablet and small laptop.

Warren Young
  • 5,224
  • 1
  • 25
  • 35
  • You could try to do a one-shot HDR blending on the rocks pictures... modern camera have sometime surprising latitude in raw files. – Rmano May 22 '14 at 15:37
  • 1
    @Rmano: That's just a way to try to achieve in an automated way what I did by hand. It can work. I occasionally use the "Auto" button in Lightroom to similar effect; it gives me a result I'm happy with about 20% of the time. I think care and taste played a lot in achieving my final result, however. A computer wouldn't know how to strike the balance between "not enough" and "too much." – Warren Young May 22 '14 at 15:43
  • It's really hard for me to believe that RAW has a wider dynamic range than JPG but everyone says the same so I should really try. Thanks. – Revious May 23 '14 at 08:53
  • 1
    @Revious: Some boxes of crayons are bigger than others. Another of my answers here explains the technical aspects. Try this: download the first pic above and try to make it look like the second. You might get fairly close, but the result will have banding, clipping, or both. Why? All three pics above are JPEGs. JPEG is fine for final presentation, but no good if you need to do strong brightness correction. – Warren Young May 23 '14 at 09:46
  • I went ahead and tried that experiment. I have the advantage that I could simply load the 8-bit JPEG version of the underexposed original back into Lightroom, then copy over the adjustments. The result was far from identical. There was no banding, due I believe to automatic dithering in Lightroom. It was overly contrasty, though, indicating dynamic range compression. The JPEG artifacts became highly visible, too, especially in the sky. – Warren Young May 31 '14 at 03:37
7

The second image has been heavily altered to boost contrast. You can tell from how artificial the cat looks.

That said, the first image won't look as good because there is also a ton of haze in that image. The haze is obscuring detail of the sky and making it more white than blue. Circularly polarized filters help with this and may have been used in the second image as well as editing to boost contrast.

Images from Canon cameras are perfectly capable of being manipulated to look just like the sample image you provided though, you just need to make sure you are starting with an image with a good clear sky and then increase the contrast and shadows to make sure you get a really rich looking sky.

AJ Henderson
  • 34,864
  • 5
  • 54
  • 91
  • Polarizers don't fix haze. Detail obscured is lost forever. It's no different than trying to take a clear picture through a window with gauzy curtains drawn. (Skylight/haze filters don't remove haze, either; they just bias the colors a smidge to cancel some of the blueness. The detail is still gone.) A polarizer can help the mountain pic, but it works by reducing the amount of light from the sky, by taking advantage of the non-polarized nature of off-axis sky light. – Warren Young May 22 '14 at 14:44
  • 1
    @WarrenYoung - except the detail isn't entirely obscured by haze directly. It is partially obscured by light reflecting off the haze. If you filter out that glare, you can see through it much more clearly. It won't work in every case as it does depend on the angle of the light, but it can make a substantial difference. – AJ Henderson May 22 '14 at 14:47
  • I don't think we're really disagreeing. You're just making a distinction between light from the sky and light from the haze. To me, it's all skylight. I make a distinction between the sky and the haze, but only in the sense that it's a 3D veil between the camera and distant objects. 3D, because the farther the subject, the deeper the haze. – Warren Young May 22 '14 at 16:01
  • @WarrenYoung - yeah, I agree that there isn't a significant difference between what we are saying. The polarizer removes light reflected off both the haze and the atmosphere, and really, the haze between the camera and the mountain is just a closer portion of the atmosphere. – AJ Henderson May 22 '14 at 16:03
  • Saying that a circularly polarizing filter is needed is a bit misleading. To help accentuate the blue of the sky and reduce some of the haze you need a linear polarizing filter. However, the exposure meter in some cameras doesn't deal well with polarized light, so you need a linear polarizer followed by something that effectively scrambles the polarization afterwards. Unfortunately, in photography such a filter has become known as a "circular polarizer", which means something else in physics. There is also left and right handed circular polarization, but that won't help with photography. – Olin Lathrop May 22 '14 at 16:17
  • 2
    @OlinLathrop - yes, which means that in photography land, you need a circular polarizer, because a linear polarizer won't work right with modern cameras and thus a circular polarizer (as it is called in photography, whether correct or not) is in fact what they need. – AJ Henderson May 22 '14 at 16:26
  • The point is that the "circular" part is a requirement of the camera, and has nothing to do with getting a bluer sky and the like. In this case we know the OP's camera, which indeed requires a circular polarizer. However, these are two different concepts, which post confuses into one. Your end advice is correct, but the reason you give for it is misleading. – Olin Lathrop May 22 '14 at 19:28
  • @OlinLathrop - I don't give a reason why it needs to be a circular polarizer. I simply state that they help with this situation. In some cases just a linear polarizer might be able to be used, but in many it can't, so it is less constructive to add confusion about a technicality irrelevant to the OPs question. – AJ Henderson May 22 '14 at 19:44
6

The problem with your picture is that distant objects get atmospheric haze added to them in a photograph. This shows up mostly as a elevated black level, and usually a little bluish tint. In this case, it is the black areas of the distant mountains being well above the picture's black that give the "flat" appearance you mention. To prove that, here are a few simple manipulations of your picture:

This is your original for reference:

The first thing to do is to make the darkest areas black. Your black level was about 2% in the red and green channels. That's not a lot, but enough to see a small improvement if you look closely:

So far, no information has been lost. We've only used the available dynamic range more effectively. However, if the main point of the picture is the mountains in the back, then you need to cancel most of the haze. I did that by setting the black level to the darkest part of the background starting roughly at the base of the mountains. I also cranked up the saturation a bit:

The mountains "pop" more now than in the original. In this case I applied all the effects globally, so the dark areas in the foreground have lost some information. The dark areas look more like dark splotches. Depending on what effect you are trying to achieve, this might actually be desirable. Or, by spending more time you can apply different black levels to different parts of the picture, sortof doing a HDR from just a single original.

There is lots more that could be done, but I think these manipulations show what the basic issues are well enough.

Starting with a original taken with a polarizing filter would help too.

Olin Lathrop
  • 17,402
  • 1
  • 32
  • 68
1

The difference between the two photos has absolutely nothing to do with the make of the camera: the differences are the quality of the light and the editing that's been done to the cat photo.

The light in the mountain photo has been flattened out by the clouds and haze and, from the shadowing on the intruding foreground pole, seems to be pointed close to straight on to the mountains. That means it isn't casting any interesting shadows: the side of the mountains you can see is lit, and the side you can't is in shadow.

In contrast (pun unintended but appropriate), the light in the cat photo is casting visible shadows (for example on the roof tiles and the cat) and the image has been quite heavily edited. If it hadn't been edited, much of what you see would be close to silhouetted.

Also, it's not what you were asking about but the mountain picture is leaning heavily to the left and it's always a good idea to check around the edges of the frame for intruding objects like that scaffolding pole.

David Richerby
  • 1,340
  • 10
  • 19
0

The second image looks very HDR-ish to me, it's probably a bland of multiple exposures.

Usually you get nice detail in the sky if you set your exposure down - you get a darker sky with more details as opposed to bright washed out sky you get with the "right" exposure.

A polarizer also works great - but I don't use one myself.

Obviously, if you set your exposure for the sky everything that is not as bright as the sky (in other words, everything but the sky) will be too dark, this leaves you with two choices:

  1. HDR

  2. Flash (this works great with a single subject against the sky - but a total no-go if you need to light huge areas like in this image)

Nir
  • 20,825
  • 4
  • 38
  • 74
  • Looking through the comments on the original post of the cat image, the author claims that this is not hdr, only contrast/tonal adjustments on an already nice raw capture in adobe lightroom. – PlasmaHH May 22 '14 at 15:02
  • @PlasmaHH sometime you can do HDR-like effect by manipulation of the tone curve. – Rmano May 22 '14 at 15:35
  • 1
    @Rmano: Yes, this is a prime example how it makes things look like hdr, but actually isn't. Using RAW, actually you often do some dynamic compression, helping in this effect. It is however not "true" HDR in the sense of that exposure bracketing is used to greatly extend the dynamic range much beyond what the sensor is capable to capture. – PlasmaHH May 22 '14 at 15:41
  • True HDR does not require bracketing images. High Dynamic Range Imaging has been around in one form or another since the 1850s and is a general term that applies to a plethora of ways to stretch the dynamic range of a photo beyond the typical methods of that time period. "True" HDR is not limited only to 32-bit floating point images created from multiple bracketed exposures. – Michael C May 23 '14 at 04:37
  • @MichaelClark If you only have one image then, however much you edit it, your dynamic range is no greater than the dynamic range of the sensor. Also, what is a 32-bit floating point image? All image formats I'm aware of use integer representations. – David Richerby May 24 '14 at 01:22
  • @DavidRicherby A 32-bit floating point image is what most "HDR" programs create when combining several exposures. Of course no monitor nor printer can display this image, so it must be tone mapped down to (usually) 8-bits to actually be seen. Each time you make an adjustment the program will usually remap the image to include the adjustment you just made into 8-bits and send it to the display. When you open a RAW file or an "HDR" image what you see on the screen is that image remapped to 8-bits. – Michael C May 24 '14 at 04:17
  • Since most current DSLRs have sensors with about 12-14 bit dynamic range it is well within the realm of possibility that tone mapping a single 14-bit RAW file can display details in an 8-bit image that were more than 8 bits apart when read by the sensor. – Michael C May 24 '14 at 04:17
  • @MichaelClark Dynamic range is measured in stops, not bits, and is independent of bit depth. Dynamic range is a measure of how far apart in illumination are the brightest and darkest objects can be simultaneously photographed without the dark one registering as pure black and the bright one as pure white. Bit depth is a measure of how many shades of grey (let's suppose b/w) can be distinguished between those values. These two quantities are completely independent: in theory, you could build a 100-bit sensor that only had a half-stop dynamic range. – David Richerby May 24 '14 at 11:50
  • @MichaelClark And it plain doesn't make sense to claim that an image captured using the standard dynamic range of the sensor is HDR. It's not "high": it's completely normal. It doesn't matter how many bits you use to represent the colours (i.e., how precisely you record them); you still only have whatever dynamic range the sensor gave you, which is about 6 stops on a DSLR. A RAW file doesn't give you any more dynamic range: it just gives you more resolution of colours within that range, like adding half-millimetre marks to a metre rule lets you measure more precisely but still only to a metre. – David Richerby May 24 '14 at 11:54
  • @DavidRicherby You seem to misunderstand the difference between dynamic range (the "height" of color gamut) and bit depth (the "width" of color gamut). Actually 14-bit sensors can typically record 11-12 stops of dynamic range in a RAW file. The 8-bit JPEG standard is limited to about 6 stops. But you can tone map those 12 stops into 6 stops before converting to JPEG. – Michael C May 25 '14 at 00:19
  • @DavidRicherby You don't even need a sensor to do "High Dynamic Range Imaging". The dodging and burning that Ansel Adams perfected and raised to an art form in the mid-20th century is also a form of HDR imaging. So is what Gustave LeGray did in the 1850s when he combined two differently exposed (bracketed) negatives to produce seascapes with both skies and sea properly exposed. – Michael C May 25 '14 at 00:22
  • @DavidRicherby It is true that you could use many bits to represent very smooth gradations within a very limited D.R. But it is also true that at minimum you need 1-2 more bits than the number of stops (D.R.) you wish to capture with a sensor to allow for the noise floor. Remember that what a digital sensor captures is a monochromatic luminance value at each pixel well: it is a measure of the amount of light reaching the well after passing through whatever filtering is on top of it. Color gradations (or B&W for that matter when using a Bayer masked sensor) are only created after the RAW data – Michael C May 25 '14 at 00:30
  • ... is demosaicied. – Michael C May 25 '14 at 00:30
0

Processing absolutely played a part in the example you gave, and others have covered some of the processing techniques quite well already.

In addition to processing, though, don't forget to shoot under the right conditions -- specifically, time of day. Note the position of the sun in your reference photo: this is golden hour, when the sun's light is warmer and less harsh than during full daylight. Shooting during golden hour will give you a massive head start when you start exploring some of the processing techniques outlined here.

D. Lambert
  • 10,487
  • 4
  • 35
  • 60