You can use a combination of custom qgis functions, virtual layers and virtual fields to achieve your goal.
Below is an example workflow which you can follow. You will just need to change a few details to match your own, such as layout name, layer names etc.
To start with, I am using the Natural Earth populated places dataset for this example which I have loaded into a project. I have also created a new print layout called 'Test', and added a new map item to the layout.
The populated places layer is the full dataset we will be querying to create our virtual layer. However, we do not want to actually display this layer so, first of all, go into Layer Properties -> Symbology and change symbol type to No Symbols.

Next, we need to create our custom QgsFunction. To do this we need to open an Expression Builder dialog. This can be done from many places within QGIS by clicking the  icon. However, a quick, easy way to access this dialog is by using the Select By Expression icon
With the Expression Builder dialog open, switch to the Function Editor tab. Use the green 'plus' button to create a new file, give it a name and paste in the following script (making sure to replace the layout name 'Test' with the name of your own layout):
from qgis.core import QgsProject, QgsGeometry, QgsLayoutItemMap
@qgsfunction(args='auto', group='Custom')
def layoutMapExtent(feature, parent):
    lo = QgsProject.instance().layoutManager().layoutByName('Test')
    map_item = [i for i in lo.items() if isinstance(i, QgsLayoutItemMap)][0]
    map_geom = QgsGeometry().fromRect(map_item.extent())
    return map_geom
Then click 'Save and Load Functions'

Now it's time to create a virtual layer via the menu options shown below:

In the virtual layer dialog, click 'Import' and select the layer you are working with. In my case, I select my Populated Places layer. Click OK.

Now, paste the following SQL query into the query window. Note: here you will need to change the layer name in the query to match yours! Also note that in the query we are using the custom function we created earlier to return the current extent of the map item in our print layout. You could also try a different geometric predicate for the query, so instead of st_intersects you could try st_within.
SELECT *
FROM ne_10m_populated_places_simple
WHERE st_intersects(ne_10m_populated_places_simple.geometry, layoutMapExtent());
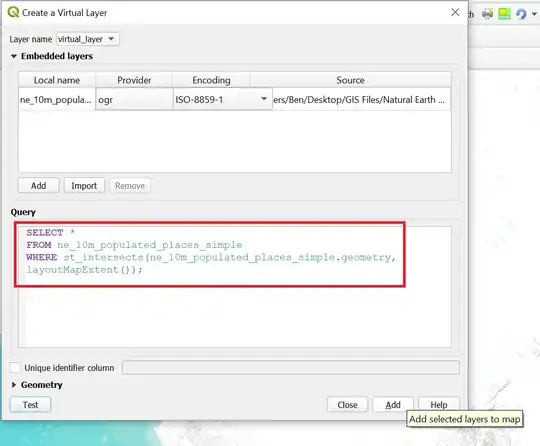
You can use the 'Test' button to check that there are no errors and, if all is well, click 'Add'.
Next, select the virtual layer in the TOC and open the Field Calculator:

Create a Virtual Field (I named it 'Label_No'). This field will dynamically number the features in the virtual layer depending on the extent of the associated layout map. Populate the field with the expression $id+1. This will ensure that the numbering starts from 1 instead of 0.

We can now use this virtual field to label the features in our virtual layer:

Now you can open your print layout and add an attribute table. In the screenshot below you can see that I have selected the virtual layer in the 'Layer' combo box. You can also see that I click the 'Attributes' button, highlight rows in the 'Columns' table and use the red 'Minus' button to remove columns I don't want in order to make the layout table a more manageable size.

The short screencast below shows the final result. As you drag (or zoom) the contents of the layout map, the features shown should be dynamically numbered starting from 1. Note that to update the attribute table, you need to select it then under Item properties -> Main properties click 'Refresh Table Data'.

Acknowledgement: I adapted the custom function and SQL query in my answer from @JGH's answer to this question.


