Overview
I'll see if I can suggest a usable path to try.
You want a counter that has six states. On a dice-roller circuit, it probably doesn't matter what order those states are generated. So [1, 2, 3, 4, 5, 6, 1, 2, ...] would be just as good as [5, 2, 4, 3, 6, 1, 5, 2, 4, ...], since all that matters is that it appears random to the user. (You'll need a sufficiently fast clock.)
There are 720 possible sequence permutations to analyze if you wanted to exhaustively explore every arrangement in order to select by brute-force a fully optimized design result. But for hand-work, that's crazy. (With a computer program, you might be expected to do that. But not by hand.)
So the better option for hand work is to assume a simple [1, 2, 3, 4, 5, 6, 1, 2, ...] sequence. (Unless you have prior knowledge to apply. And I don't, off-hand.)
Excitation Tables and FF Types
Excitation tables are often used to work out the combinatorial logic needed to transition a set of FFs holding the current state into the next desired state for some arbitrary (usually circular) sequential series of states. They aren't hard to make and it would be very easy to write some code expand any given sequence into these tables. Once produced, they are usually turned into k-maps for minimization purposes.
Most often, these tables are meant to help when using JK-type (JKFF), toggle-type (TFF), or D-type (DFF) flip flops. The JK-type has two inputs and the others have just one input.
For each kind of possible transition, their inputs are represented in the following table:
$$\begin{array}{c|c|c}
\text{Transition} & \text{JK FF} & \text{T FF} & \text{D FF}\\\hline
{\begin{smallmatrix}\begin{array}{c}
\text{start }\to\text{ end}\\\\
0 \quad \to \quad 0\\
1 \quad \to \quad 1\\
0 \quad \to \quad 1\\
1 \quad \to \quad 0
\end{array}\end{smallmatrix}} &
{\begin{smallmatrix}\begin{array}{cc}
J & K \\\\
0&x\\
x&0\\
1&x\\
x&1
\end{array}\end{smallmatrix}} &
{\begin{smallmatrix}\begin{array}{c}
T\\\\
0\\
0\\
1\\
1
\end{array}\end{smallmatrix}} &
{\begin{smallmatrix}\begin{array}{c}
D\\\\
0\\
1\\
1\\
0
\end{array}\end{smallmatrix}}
\end{array}$$
(Obviously, the DFF just wants the next state fed to its input.)
To keep all your options on the table (no pun intented), you don't have to choose a specific type of FF before starting out. Instead, you can lay out a table listing each of your states, in order, and include all of the inputs for theabove types of FF as columns.
You can then analyze all possibilities, see what's easier to implement, and select the FF type as a result of that.
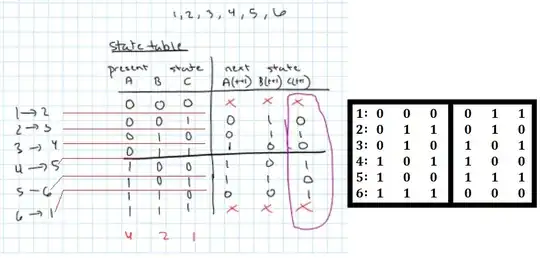
Excitation table for a 1 through 6 Die
Since you want the starting condition to be \$0 0 1\$ and since the likely assumption is that a power-on reset (externally applied to devices accepting it, or internally) will cause any given FF to start out as \$0\$, we'll require FFs with both \$Q\$ and \$\overline{Q}\$. (After your work product addition below this answer in comments, I'm editing the order here to fit your choice there; 2021.4.16.) Accepting that, you will be using the \$Q_A\$, \$Q_B\$, and \$\overline{Q_C}\$ outputs, so that it starts out as \$0 0 1\$ after a power-on reset.
Note that the only reason for using the RESET or PRESET
of an FF here is for the power-on condition so that it starts at the
right place. You will not use those for any other reason.
The table is then:
$$\begin{array}{c|c}
\text{States} & \text{Excitations}\\\hline\\
{\begin{smallmatrix}\begin{array}{cccc}
Q_A & Q_B & Q_C\\\\
\vphantom{\left.\overbrace{\begin{array}{ccc}J & K & T & D\end{array} } \right.}\\
0&0&0\\
0&1&1\\
0&1&0\\
1&0&1\\
1&0&0\\
1&1&1\\\\
0&0&1\\
1&1&0
\end{array}\end{smallmatrix}} &
{\begin{smallmatrix}\begin{array}{cccc}
Q_A & Q_B & Q_C\\
\left.\overbrace{\begin{array}{cc:c:c}J & K & T & D\\\\
0&x&0&0\\
0&x&0&0\\
1&x&1&1\\
x&0&0&1\\
x&0&0&1\\
x&1&1&0\\\\
x&x&x&x\\
x&x&x&x
\end{array} } \right. &
\left.\overbrace{\begin{array}{cc:c:c}J & K & T & D\\\\
1&x&1&1\\
x&0&0&1\\
x&1&1&0\\
0&x&0&0\\
1&x&1&1\\
x&1&1&0\\\\
x&x&x&x\\
x&x&x&x
\end{array} } \right. &
\left.\overbrace{\begin{array}{cc:c:c}J & K & T & D\\\\
1&x&1&1\\
x&1&1&0\\
1&x&1&1\\
x&1&1&0\\
1&x&1&1\\
x&1&1&0\\\\
x&x&x&x\\
x&x&x&x
\end{array} } \right.
\end{array}\end{smallmatrix}}
\end{array}$$
Note also that the handling of \$Q_A\$ is drawn from the opposite
transitions shown in the first table (the transition table for the
various kinds of FFs.)
If you've followed along well enough so far then you may know that the next stage is to re-order the above table in order to more easily generate k-maps for each possible input of each possible FF. The only reason for not assuming a particular FF in the beginning is that sometimes you might spot (observe) that one or another type of FF will be easier. (In practice, the JKFF is a superset of the TFF so it isn't necessary to analyze the TFF, separately. But it's probably good practice to list it as well, since it isn't hard to do.)
So now it is your turn. (You did take your turn in your added comments below. Thanks!!)
K-maps added 2021.4.16 :
K-Maps
Thanks for adding your work product in your comments below this answer. I see that while I originally chose \$Q_A\$ as the least significant bit, you chose \$Q_C\$ for that same position. That's fine. We just did things differently. I've already edited my own response above to stick with your example.
In your work I find the following problem, immediately:
Look at my table over on the right side. Compare it to yours. Now go back up in my answer to where I already developed this, correctly. In your work (which obviously wasn't copied from mine, above), you've made a mistake. There are two states you do not want: 001 (which would be seen as zero) and 110 (which would be seen as 7), as the least significant bit is inverted in the output.
Of course, I'm assuming that you agree with me that when coming out of reset the DFFs will all have \$Q=0\$ and \$\overline{Q}=1\$.
Let's list out the states in the order needed for generating k-maps:
$$\begin{array}{c|c}
\text{States} & \text{Excitations}\\\hline\\
{\begin{smallmatrix}\begin{array}{cccc}
Q_A & Q_B & Q_C\\\\
\vphantom{\left.\overbrace{\begin{array}{ccc}J & K & T & D\end{array} } \right.}\\
0&0&0\\
\\\hline
0&0&1\\\hline
\\
0&1&1\\
0&1&0\\
1&0&0\\
1&0&1\\
1&1&1\\
\\\hline
1&1&0\\\hline
\end{array}\end{smallmatrix}} &
{\begin{smallmatrix}\begin{array}{cccc}
Q_A & Q_B & Q_C\\
\left.\overbrace{\begin{array}{cc:c:c}J & K & T & D\\\\
0&x&0&0\\
\\\hline
x&x&x&x\\\hline
\\
0&x&0&0\\
1&x&1&1\\
x&0&0&1\\
x&0&0&1\\
x&1&1&0\\
\\\hline
x&x&x&x\\\hline
\end{array} } \right. &
\left.\overbrace{\begin{array}{cc:c:c}J & K & T & D\\\\
1&x&1&1\\
\\\hline
x&x&x&x\\\hline
\\
x&0&0&1\\
x&1&1&0\\
1&x&1&1\\
0&x&0&0\\
x&1&1&0\\
\\\hline
x&x&x&x\\\hline
\end{array} } \right. &
\left.\overbrace{\begin{array}{cc:c:c}J & K & T & D\\\\
1&x&1&1\\
\\\hline
x&x&x&x\\\hline
\\
x&1&1&0\\
1&x&1&1\\
1&x&1&1\\
x&1&1&0\\
x&1&1&0\\
\\\hline
x&x&x&x\\\hline
\end{array} } \right.
\end{array}\end{smallmatrix}}
\end{array}$$
(I've highlighted the two "illegal cases" by separating them out, above.)
A complete list of your k-maps would then be (but I've boxed up your DFF ones, to highlight those):
$$\begin{array}{rl}
\begin{smallmatrix}\begin{array}{r|cccc}
Q_A\text{ }J&\overline{Q_B}\:\overline{Q_C}&\overline{Q_B}\: Q_C&Q_B \:Q_C&Q_B \:\overline{Q_C}\\
\hline
\overline{Q_A}&0&x&0&1\\
Q_A&x&x&x&x
\end{array}\end{smallmatrix}
&
\begin{smallmatrix}\begin{array}{r|cccc}
Q_A\text{ }K&\overline{Q_B}\:\overline{Q_C}&\overline{Q_B}\: Q_C&Q_B \:Q_C&Q_B \:\overline{Q_C}\\
\hline
\overline{Q_A}&x&x&x&x\\
Q_A&0&0&1&x
\end{array}\end{smallmatrix}\\\\
\begin{smallmatrix}\begin{array}{r|cccc}
Q_A\text{ }T&\overline{Q_B}\:\overline{Q_C}&\overline{Q_B}\: Q_C&Q_B \:Q_C&Q_B \:\overline{Q_C}\\
\hline
\overline{Q_A}&0&x&0&1\\
Q_A&0&0&1&x
\end{array}\end{smallmatrix}
&
\boxed{\begin{smallmatrix}\begin{array}{r|cccc}
Q_A\text{ }D&\overline{Q_B}\:\overline{Q_C}&\overline{Q_B}\: Q_C&Q_B \:Q_C&Q_B \:\overline{Q_C}\\
\hline
\overline{Q_A}&0&x&0&1\\
Q_A&1&1&0&x
\end{array}\end{smallmatrix}}
\\\\
\begin{smallmatrix}\begin{array}{r|cccc}
Q_B\text{ }J&\overline{Q_B}\:\overline{Q_C}&\overline{Q_B}\: Q_C&Q_B \:Q_C&Q_B \:\overline{Q_C}\\
\hline
\overline{Q_A}&1&x&x&x\\
Q_A&1&0&x&x
\end{array}\end{smallmatrix}
&
\begin{smallmatrix}\begin{array}{r|cccc}
Q_B\text{ }K&\overline{Q_B}\:\overline{Q_C}&\overline{Q_B}\: Q_C&Q_B \:Q_C&Q_B \:\overline{Q_C}\\
\hline
\overline{Q_A}&x&x&0&1\\
Q_A&x&x&1&x
\end{array}\end{smallmatrix}\\\\
\begin{smallmatrix}\begin{array}{r|cccc}
Q_B\text{ }T&\overline{Q_B}\:\overline{Q_C}&\overline{Q_B}\: Q_C&Q_B \:Q_C&Q_B \:\overline{Q_C}\\
\hline
\overline{Q_A}&1&x&0&1\\
Q_A&1&0&1&x
\end{array}\end{smallmatrix}
&
\boxed{\begin{smallmatrix}\begin{array}{r|cccc}
Q_B\text{ }D&\overline{Q_B}\:\overline{Q_C}&\overline{Q_B}\: Q_C&Q_B \:Q_C&Q_B \:\overline{Q_C}\\
\hline
\overline{Q_A}&1&x&1&0\\
Q_A&1&0&0&x
\end{array}\end{smallmatrix}}
\\\\
\begin{smallmatrix}\begin{array}{r|cccc}
Q_C\text{ }J&\overline{Q_B}\:\overline{Q_C}&\overline{Q_B}\: Q_C&Q_B \:Q_C&Q_B \:\overline{Q_C}\\
\hline
\overline{Q_A}&1&x&x&1\\
Q_A&1&x&x&x
\end{array}\end{smallmatrix}
&
\begin{smallmatrix}\begin{array}{r|cccc}
Q_C\text{ }K&\overline{Q_B}\:\overline{Q_C}&\overline{Q_B}\: Q_C&Q_B \:Q_C&Q_B \:\overline{Q_C}\\
\hline
\overline{Q_A}&x&x&1&x\\
Q_A&x&1&1&x
\end{array}\end{smallmatrix}\\\\
\begin{smallmatrix}\begin{array}{r|cccc}
Q_C\text{ }T&\overline{Q_B}\:\overline{Q_C}&\overline{Q_B}\: Q_C&Q_B \:Q_C&Q_B \:\overline{Q_C}\\
\hline
\overline{Q_A}&1&x&1&1\\
Q_A&1&1&1&x
\end{array}\end{smallmatrix}
&
\boxed{\begin{smallmatrix}\begin{array}{r|cccc}
Q_C\text{ }D&\overline{Q_B}\:\overline{Q_C}&\overline{Q_B}\: Q_C&Q_B \:Q_C&Q_B \:\overline{Q_C}\\
\hline
\overline{Q_A}&1&x&0&1\\
Q_A&1&0&0&x
\end{array}\end{smallmatrix}}
\end{array}$$
Please check my work and see if you agree. If so, perhaps now you can figure out the logic?
By the way, I'd personally go for the JKFF rather than the DFF. But it is your call.
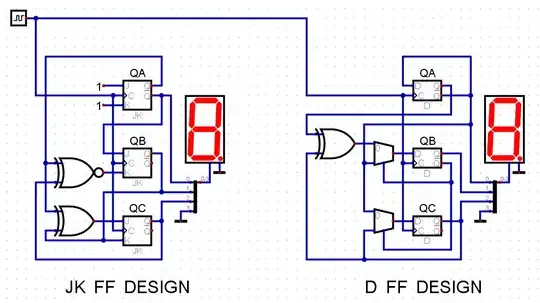
Diagrams from Neemann's Digital program added 2021.4.19 :
I've added these diagrams for completeness now that enough time has passed. That way, this answer can be studied by those wishing to teach themselves and needing to see what a completed design might look like. (Not the best way, as that depends on circumstances. Just a way.)


does something with the feedback... think about feedback to all three flip-flops ... you do not need to re-roll if 7 never happens – jsotola Apr 13 '21 at 16:30