13

I want to lay laminate flooring throughout my apartment as one big continuous floor. Normally you start laying a row against a wall and then create a new row and click it into the previous row. This click mechanism only works correctly in one direction. The following (simple) image shows the situation (the yellow represents a wall)

enter image description here

How do I lay the planks in the area marked as A since the "click system" doesn't work in that direction?

BMitch
  • 42,865
  • 14
  • 93
  • 200
olle
  • 233
  • 1
  • 2
  • 6
  • 1
    This will require lots of measuring and math. – Tester101 Sep 27 '12 at 14:30
  • Floating laminate floor? – The Evil Greebo Sep 27 '12 at 14:30
  • Not really. He's orienting it wrong. ;) Its supposed to run with the long wall in each room... ;) – The Evil Greebo Sep 27 '12 at 14:30
  • @TheEvilGreebo from what I have heard you are supposed to lay it in the direction of the natural light sources which in this case are windows at the top and bottom of the image. It's also the same direction the current floor panels are in. – olle Sep 27 '12 at 14:35
  • 1
    It's a stylistic choice, I just always heard "run it with the long wall". – The Evil Greebo Sep 27 '12 at 15:02
  • The first problem your having, is that you're thinking about it wrong. When laying a floor across multiple rooms, you'll be planning as if it were one room. The walls are not walls, they are simply obstacles. You'll plan and lay the floor in all the rooms at the same time. – Tester101 Sep 27 '12 at 15:12
  • Yes to all the comments about orientation. Also if you have a very long narrow room, following the long wall will make it look longer and narrower. Depends what you want. – bib Sep 27 '12 at 15:25

3 Answers3

11

First of all, I disagree with your orientation. But, it is your choice, and I'll respect that.

You may want to read this: http://diy.blogoverflow.com/2012/09/installing-laminateengineered-wood-floating-floors/

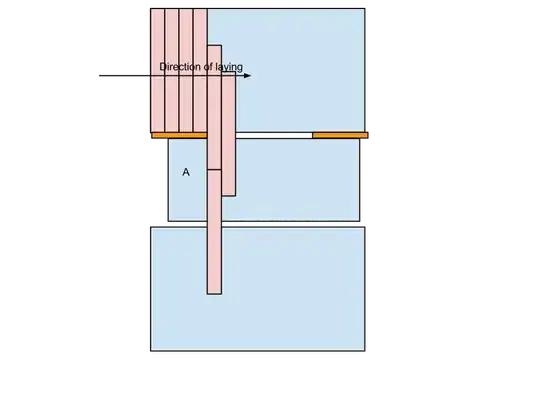
Pay close attention to the pre-measuring, so that you avoid having a 1 inch board running along either wall.

The idea is that you never want to rip a board to less than half it's width. If you end up with a half - board gap along either wall, then you should really be using a 3/4 board gap along BOTH walls (That is, convert the final 1.5 board widths to two 3/4 board widths at start and finish, or whatever fraction works for your measurement.)

It's going to be particularly tricky in this case, because you have 4 different measurements to deal with (three rooms + opening). However, it is an important step. It's going to be some tough geometry to strike the right compromises. You might find it easier to work in Board Widths rather than inches. Just be careful with the conversions!

Don't be afraid to notch the board so that it slips around the wall if required. Again, see the blog post for measuring tips.

Once you've figured out the measuring, proceed as The Evil Greebo suggests. However, you're going to want to start against the wall that will leave you the smallest amount of floor to slide around to make it connect up. This material has to be aligned exactly for it to snap together. From your drawing (which may not be to scale) I'd start at the right side.

Your wiggle room is the width of the baseboards and quarter round you're going to use to finish the job. You need a 1/4 inch gap from all the walls, and a typical baseboard + 1/4 round can cover up to 3/4 of an inch. (But do a recon at the Home Depot and actually measure this stuff so you know what errors you can cover up)

Chris Cudmore
  • 14,129
  • 7
  • 59
  • 89
10

While I disagree with your orientation, this isn't really that hard as long as you're using a floating floor.

Start by running a line of boards across all three rooms, and orient them so they are as perpendicular as possible to all the walls. (Alternatively snap a chalk line to represent the left edge of that single line of boards.

Now in each room, measure from the left edge (or chalk line) of the board to the left hand wall. Divide that distance by the width of your boards. The remainder is the width of your starter boards in each room. Rip your boards to fit.

Start laying the boards out in the room with the most distance to the left of the line. When you get to your opening, stop - lay the boards out in the next room until they come up to the opening. Run your line of boards from the first room into the 2nd room.

Now since its a floating floor, shift the floor in the new room to align with the board sticking into the room. Click the connecting board into place, and you now have a continuously aligned run.

Repeat for room 3.

The Evil Greebo
  • 25,851
  • 16
  • 90
  • 124
2

Lay the boards into area A first, before laying the boards that join the adjoining rooms. Area A may be fractional (in the number of board widths required). That can all be measured: you can start laying area A with a fractional board (which has been cut to size lengthwise). When the long boards are laid to span and join the adjoining areas, some minor adjustment will be required (sliding the A area this way or that). If you do your calculations right, that adjustment should be small, well within the tolerance which is concealed by baseboards.

Anon
  • 21
  • 1