87

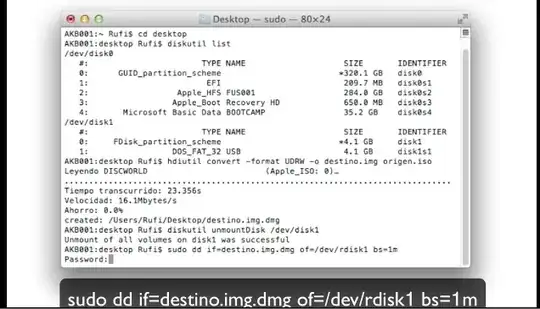
I have tried to copy an ISO file to a USB drive. I am unable to do it with Disk Utility. How can I copy the ISO file to a USB drive?

enter image description here

But I get the below. I have enough space in the 16GB USB drive for the 2GB ISO file. What am I doing wrong?

enter image description here

Debugging

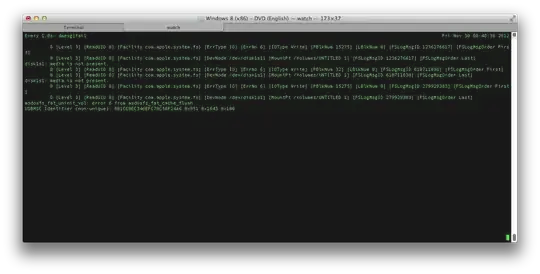
Bmike commented "You can isolate the scanning of the image from the restoring to see if the problem lies with the image or the copy. Images -> Scan Image for Restore... from the menu of Disk Utility." but the procedure fires the error below. What does it mean?

enter image description here

hhh
  • 3,904
  • You can isolate the scanning of the image from the restoring to see if the problem lies with the image or the copy. Images -> Scan Image for Restore... from the menu of Disk Utility. – bmike Nov 29 '12 at 18:11
  • 6
    The reason it won't work this way is because OS X does not natively read the file format of that particular iso, which is likely ntfs. The reason dd works is because it is a low-level block copy utility, thus the file system is irrelevant. – chillin May 11 '14 at 18:00

11 Answers11

212

IMHO the easiest way is in terminal:

  1. First run diskutil list
  2. then insert your usb stick
  3. and run diskutil list again to see the disk node (e.g. /dev/disk2).
  4. Now run diskutil unmountDisk /dev/diskN
  5. and do sudo dd if=/path-to.iso of=/dev/rdiskN bs=1m (or bs=1M with homebrew)
  6. When finished diskutil eject /dev/diskN
nohillside
  • 100,768
laktak
  • 3,198
33

From http://www.youtube.com/watch?v=fu2g_E2ZK8A:

Screen shot from video

You can also can try this. It works for me. This is a rather "raw" copy and will typically not work for a bootable USB, but will work for other cases.

Here is a transcription of the commands from the screen shot for your copy/paste pleasure.

diskutil list                                            # shows disks
hdiutil convert -format UDRW -o destino.img origen.iso   # convert to dmg
sudo dd if=destino.img.dmg of=/dev/rdisk1 bs=1m          # copy to USB on rdisk1
tripleee
  • 1,027
10

If you want your USB to be "bootable" when all is said and done (ex: windows install disk), you're going to either want to use the Boot Camp Assistant (only check the "Create a Windows 7 or later version install disk" checkbox, then follow the prompts, it will create a FAT32 (i.e. bootable) USB version of your ISO file).

Some ISO's are created "special" to not need this, but not all are (ex: windows install disks). Details: https://superuser.com/q/1063220/39364

I.e. dd is not always enough. Especially for windows install .iso's.

9

You can use an open source tool named UNetbootin.
Also you can see an step-by-step tutorial with images by Ubuntu in here.
enter image description here

7

This thread here outlines a graphical way of turning a USB drive into a boot disk. The user jbdjunk mentions the proceduce below, copy-pasted from the earlier site.

  1. Open Disk Utility
  2. Plug in USB
  3. Format USB to Mac Extended (Journaled)
  4. Create Partition on USB [GUID for Intel chips, APM for PPC]
  5. Unmount created Partition
  6. Drag and Drop disk image (dmg or iso) into Disk Utility
  7. Open disk image (double click or button in DU)
  8. Select opened disk image on left menu
  9. Click over to Restore
  10. Drag and drop selected image into source field
  11. Drag and drop (unmounted) USB partition into destination
  12. OK (may have to type in admin passwords and such)
  13. Wait
  14. Enjoy!
hhh
  • 3,904
4

I can confirm that an 'official' Win10 (and also Win 7.1) iso obtained from University contract distributor winds up with a UDF formatted USB stick when copied with dd. Rogerdpack's answer explains why.

Note that some versions of Boot Camp Assistant do not offer a "Win 7 or later" option; Version 3 (.2) and later do. Also, if you have copied your iso fruitlessly to the USB drive (now in UDF format) Boot Camp Assistant may (will) complain about your 8 GB flash being too small. Reformat this drive before using it in Boot Camp Assistant.

Dennis
  • 66
4

You can find the Debian-style-/dev/sdb location after $ sudo port install watch and then getting the address from the kernel ring buffer with $ sudo watch --interval=1 'dmesg|tail' so

enter image description here

now you know the address to be something like /Volumes/disk1s1 and for the mount-point like /Volumes/Untitled 1 but Apple requires some syntactic sugar in $ sudo umount /Volumes/UNTITLED\ 1/ umount(/Volumes/UNTITLED 1): Resource busy -- try 'diskutil unmount' but it won't stop us! So everything as one-liners below, enjoy!

$ sudo watch --interval=1 'dmesg|tail'
$ sudo diskutil umount /Volumes/UNTITLED\ 1/
Volume UNTITLED on disk1s1 unmounted
$ sudo dd if=en_windows_8_x86_dvd_915417.iso of=/dev/disk1s1 bs=1m 

This so far is very close to working with distros such as Ubuntu here. Now we make only a small difference to this procedure to get it working with Apple computers, namely converting the ISO into special format usually labelled with DMG or just IMG.

Apple way

The only difference to Apple is that you need to make the ISO file into special DMG file and upload that. An answer provided a video that solved the issue but this screenshot should contain all essential.

enter image description here

hhh
  • 3,904
  • ...so here I did not even try to solve the original GUI problem (there may be so many reasons for malfunctioning!), I chose the Unix -way of doing it. The error probably had something to do with some GUI thing that I cannot yet understand -- could someone help with the original err? Why did it not work like the above? – hhh Nov 29 '12 at 22:59
  • ...it is getting too long time to burn the ISO: A) it may be that I have poor USB stick (slow writing time) but it may be that there is clearly something broken in the system -- if this method and the GUI method do not work, it is probably not a good sign or? – hhh Nov 29 '12 at 23:18
  • 3
    The command can be improved, try using the raw block device and setting a decent block size: sudo dd if=en_windows_8_x86_dvd_915417.iso of=/dev/rdisk1s1 bs=1m – stuffe Nov 29 '12 at 23:26
  • 2
    You can also convert the image file from an ISO into an apple image DMG format, then do it from the GUI. It still needs a trip to the terminal to do the convert tho, as I don't think you can do this in diskutil : StuffeMac:~ stuffe$ hdiutil convert -format UDRW -o ./runtimelivecd.img ./runtimelivecd.iso – stuffe Nov 29 '12 at 23:30
  • @stuffe is it somehow easier to send packages in 1 Megabytes' blocks? Could you outline this process in answer? It had sent 1.4GB files of 2GB in 2.4k seconds when I intercepted it so the original command works but it is just a large file. Or? – hhh Nov 29 '12 at 23:33
  • @stuffe WoW! "2632460288 bytes transferred in 746.013254 secs" -- it was much faster to transfer things with "bs=1m", why? – hhh Nov 29 '12 at 23:46
  • 1
    The default block size is 512bytes, this results in many thousands more read/write operations than is required. Using larger values means it can get it's teeth stuck into it more, for want of a better analogy, you can go way higher if the device merits it (a large hard disk for example) but 1Mb is generally OK for a USB stick which isn't all that fast. Read this for some background http://forums.freebsd.org/showthread.php?t=11585 – stuffe Nov 29 '12 at 23:47
  • Also, you are using the raw device now, which hits the drive direct and ignores any buffers and caches etc which can slow things down for a massively long write operation where it's not required to use them. I doubt that this would make much difference on a USB stick, but on a hard drive with loads of fancy caching it will also boost things a lot - always a good thing to use though if you are doing an entire partition. – stuffe Nov 29 '12 at 23:50
  • In my case, with diskN, the process took about 5 minutes for 1GB. With rdiskN, it took about 30 seconds. – jcsahnwaldt Reinstate Monica May 11 '14 at 17:06
  • I've been trying to use dd to copy a Windows 7 install DVD to a partition on a USB disk, but it always results in an unmountable partition, any ideas why this would be? The data appears to copy without any issues, and the source image is a .dmg, and the partition is already FAT32 (not sure if that part matters?) but the finished partition just won't mount anything. – Haravikk Jul 17 '14 at 15:23
  • @Haravikk double check to make sure the end result is FAT32, apparently that part is required for it to be "bootable" http://superuser.com/q/1063220/39364 – rogerdpack Apr 08 '16 at 22:47
3

For people that don't want to mess with dd and need something that just works there are free cross-platform open-source apps:

 usbimager — lightweight, native GUI for win/mac/linux [source code]
 Etcher — Electron-based, win/mac/linux [source code]

Usage

To flash drag-n-drop the ISO or IMG file to the app window and click Flash.

Privacy warning

Etcher phones home for anonymous error reports and usage statistics as well as for auto-updates but the corresponding options can be disabled in Settings (the cogwheel icon).

ccpizza
  • 2,995
  • 3
  • 36
  • 41
2

If you want to make a bootable USB then I would suggest Unetbootin

limitcracker
  • 121
  • 3
1

There is no perfect tool that hands all ISO images. The approach will be totally different for data iso and bootable iso.

For data ISO, you should check using diskutil + cp commands or commercial software like Roxio Toast or free software Disco/SimplyBurns.

For bootable ISO, the situation is a bit more complicated because different OS images adopts different boot scheme. From my own experience:

UNetbootin is quite good for burning Linux ISO. It is also able to download Linux ISO images.

UUByte ISO Editor is the best fit for Windows ISO and it works quite easily because of intuitive GUI. It only takes 3-5 minutes to create a Windows bootable usb on Mac.

Etcher is good for Linux and Raspbian based image files for embedded development and it also has addition support for SD card.

So the answer is really dependent on what kind of ISO image file you are trying to copy/burn.

1

Quoting from the ubuntu article linked earlier:

I think the key is to use the drive (/dev/sdb), not the partition (/dev/sdb1), in the of= option:

sudo dd if=dban.iso of=/dev/sdb bs=1m